While a vector database is excellent for storing and retrieving information, it doesn’t generate responses. This is where RAG comes in.
Why is the use of a vector database not sufficient?
No Response Generation: A vector database can retrieve information but cannot generate natural language responses.
Limited Context Understanding: It doesn’t understand the query context or retrieved documents.
No Conversational Ability: It cannot engage in a dialogue or provide nuanced answers.
Why Not Just Use RAG?
No Data Storage: RAG relies on a retrieval system (e.g., a vector database) to provide the necessary context.
Inefficient for Large Datasets: Retrieving relevant information from large datasets would be slow and inefficient without a vector database.
How They Work Together
Vector Database: Stores and retrieves relevant information efficiently.
RAG: Uses the retrieved information to generate accurate and context-aware responses
Vector Database + RAG = Retrieval + Generation
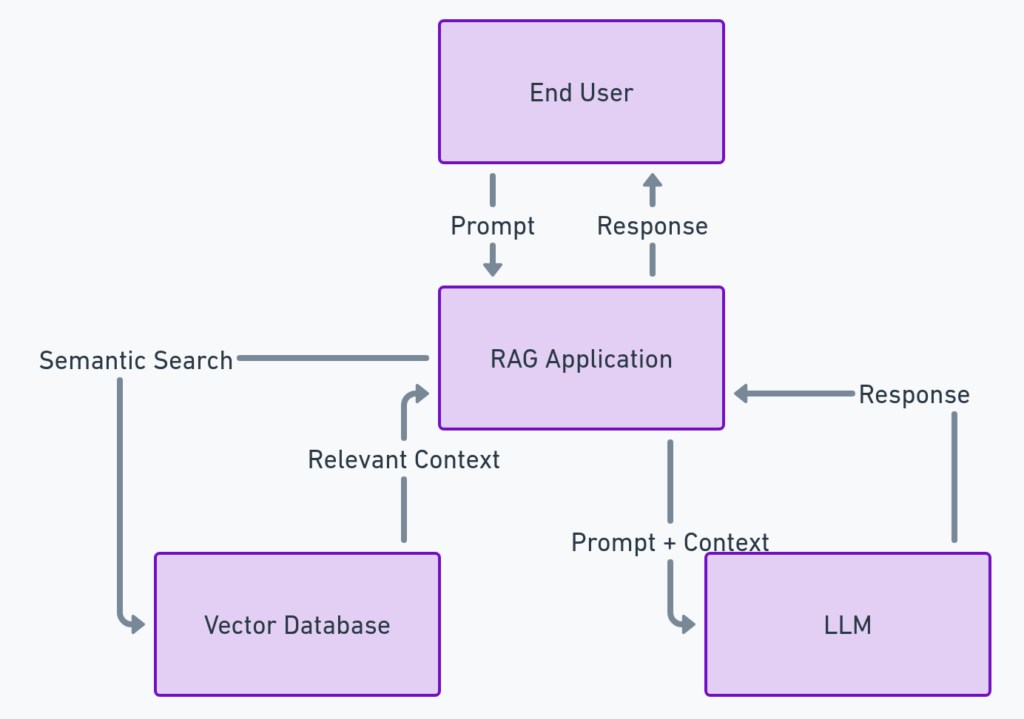
RAG uses the vector database to retrieve relevant information.
It then passes this information to an LLM, which generates a context-aware response.
This ensures that the response is not only accurate but also natural and conversational.
Key Differences
Aspect
Vector Database
RAG
Role in Workflow
Acts as a knowledge base for retrieval.
Uses retrieval to enhance LLM responses
Dependency
Can be used independently
Depends on a retrieval system (e.g., vector database) and an LLM
Input
Vector embeddings (e.g., text, images).
User queries and retrieved context.
Output
Similarity search results (e.g., documents).
Context-aware, generated responses
RAG VS VECTOR DATABASE
Example Usecase
User Query: “What are the symptoms of diabetes?”
Vector Database: Retrieves the most relevant document: “Symptoms of diabetes include frequent urination, excessive thirst, and unexplained weight loss.”
RAG:
Passes the retrieved document and the query to the LLM.
The LLM generates a response: “Common symptoms of diabetes include frequent urination, excessive thirst, and unexplained weight loss.”
RAG combines both retrieval and generation. rAG strengthens the LMMs by grounding their response in external, up-to-date, or domain-specific data. Such updates on these models enable the RAG to support applications such as question-answering systems, chatbots, and content generation that rely highly on accuracy, relevance, and context awareness.
Retrieval—the act of searching for relevant information
generation—using an LLM to produce a response
How RAG Works
Retrieval
Augmentation
Generation
When a user submits a query (e.g., “What are the symptoms of diabetes?”), the system searches a knowledge base (e.g., a vector database) for relevant information.
The knowledge base could include documents, FAQs, research papers, or other structured or unstructured data.
The retrieval process is often powered by vector embeddings and similarity search, which find the most semantically relevant information to the query.
The retrieved information (e.g., a medical guideline or research paper) is passed to the LLM as context.
This context helps the LLM understand the query better and generate a more accurate response.
The LLM uses the retrieved context and the user’s query to generate a natural language response.
The response is not only based on the LLM’s pre-trained knowledge but also on the specific, up-to-date information retrieved from the knowledge base.
Key Components of RAG
Retriever:
A system, for example, a vector database that retrieves relevant information from a knowledge base.
It often uses vector embeddings and similarity search.
Generator:
An LLM (like GPT-4, DeepSeek) generates natural language responses based on the retrieved context and the user’s query.
Knowledge Base:
A collection of documents, FAQs, or other data that the retriever searches through.
It can be stored in a vector database for efficient retrieval.
Usecase – Healthcare Chatbot
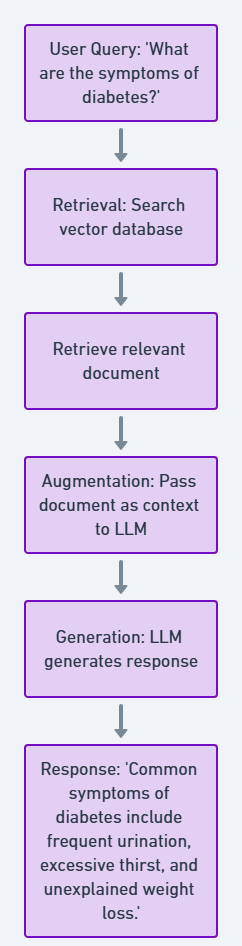
Let’s discuss how a healthcare chatbot using RAG will work.
User Query: “What are the symptoms of diabetes?”
Retrieval: The system searches a vector database of medical guidelines and retrieves the most relevant document: “Symptoms of diabetes include frequent urination, excessive thirst, and unexplained weight loss.”
Augmentation: The retrieved document is passed to the LLM as context.
Generation: The LLM generates a response: “Common symptoms of diabetes include frequent urination, excessive thirst, and unexplained weight loss.”
A vector database is a type of database that specifically stores, indexes, and retrieves high-dimensional vectors (arrays of numbers). Such vectors are generated by machine learning models, for instance LLMs (Large Language Models), to numerically represent data such as text, images, or audio. We will understand what a vector database is and why we need one to build an AI Application.
Designed to handle vector embeddings, a vector database allows the numerical representation of data, i.e., words, sentences, images. These embeddings would capture the semantic meaning of the data to allow one to perform the following operations:
Similarity search: Find those items that are semantically similar to a given query.
Clustering: Group items together that are deemed to be similar.
Classification: assign labels to items based on their embeddings.
Let us understand in layman’s language.
Think of a vector database as a supersmart librarian for a special kind of library. In this library, instead of books being organized by titles or authors, they’re organized by their meaning or content. For example:
Books about “dogs” are grouped together.
Books about “space exploration” are in another section.
Books about “healthy eating” are in yet another section.
Now, if you ask the librarian, “Can you find me books about pets?” The librarian won’t just look for the word “pets” in the titles. Instead, they’ll understand the meaning of your question and find books that are semantically related, like books about dogs, cats, or even exotic animals.
A vector database is like that super-smart librarian. It helps you find things based on their meaning, not just keywords.
How is it different?
Traditional databases can only search for exact matches (e.g., finding the word “dog” in a document).
A vector database understands the context and meaning of your query. For example:
If you search for “pets,” it will also find documents about “dogs” or “cats” because they’re semantically related.
How it works with LLMs
Modern AI models (like GPT, Gemini, DeepSeek ) can convert text, images, or audio into vector embeddings (a list of numbers representing meaning).
A vector database stores these embeddings and helps you search through them efficiently.
This diagram illustrates how a Vector Database works with an LLM. When a user submits a query (e.g., ‘What are the symptoms of diabetes?’), the LLM converts the query into a vector embedding. The Vector Database then performs a similarity search to retrieve the most relevant documents. The LLM uses this retrieved context to generate a context-aware response displayed to the user.
Use case and How Vector Database helps to solve the problem
You’re building a chatbot to answer medical questions. You have thousands of medical documents – guidelines, research papers, FAQs
If you store these documents in your traditional database, your chatbot can only search based on the keyword we discussed above. Also, your search will not be efficient or performant.
Here comes the Vector Database
Use an LLM to convert each document into a vector embedding (a numerical representation of its meaning) and store it in the vector database.
When the system gets a new user query, convert the query into a vector using the same or compatible model.
Marrying the Results with an LLM: Once you retrieve the top relevant snippets, you include them in the prompt sent to the LLM (often called “Retrieval-Augmented Generation”). This prompt typically contains the user’s question plus the relevant text snippets.
The LLM uses these snippets to produce a context-aware response grounded in the retrieved data.
The user asks, “What are the symptoms of diabetes?”
The system converts the question into a vector embedding and searches the vector database for the most relevant documents.
It finds documents about diabetes symptoms, even if they don’t explicitly mention the word “symptoms.”
Now, the user query is embedded with the Vector Database chunk.
Pass the retrieved documents and the query to the LLM.
Integrating React within a Salesforce Lightning Web Component (LWC) is a unique approach since LWC and React are both frameworks designed to control the DOM in their ways. However, it is possible to use them together, though it requires careful handling to ensure both libraries can coexist without issues.
React JS within LWC
Step 1: Setting Up Your Salesforce DX Environment
Install Salesforce CLI: Make sure you have the Salesforce CLI installed on your computer. This is essential for creating and managing your Salesforce development projects.
Create a New Salesforce DX Project: Open your terminal and run the command sfdx force:project:create -n myLwcReactProject to create a new project.
Navigate into Your Project: Use cd myLwcReactProject to move into your project directory.
Authorize a Dev Hub: If you haven’t already, authorize a Salesforce Dev Hub by running sfdx auth:web:login -d -a DevHub.
Create a Scratch Org: Create a new scratch org with sfdx force:org:create -s -f config/project-scratch-def.json -a LwcReactOrg.
Open the Scratch Org: To access your newly created org, use sfdx force:org:open.
Install the lwc-react package. You can do this by running the following command in your terminal:
npm install lwc-react
Step 2: Import React to Your Salesforce Project
Navigate to the LWC Directory: Within your project, navigate to force-app/main/default/lwc.
Create a React App: You cannot directly create a React app here. Instead, you’ll integrate React manually. Download React and ReactDOM from a CDN or NPM and include them in your Salesforce static resources.
Static Resource for React: Create a static resource for both React and ReactDOM. Use Salesforce Setup to upload these files as static resources.
Edit Your Component: In your myReactComponent directory, you’ll find three files: myReactComponent.js, myReactComponent.html, and myReactComponent.css. You’ll primarily work with the JS and HTML files.
Step 4: Integrating React into Your LWC
Load React and ReactDOM: In myReactComponent.js, use loadScript from lightning/platformResourceLoader to load React and ReactDOM from the static resources you uploaded.
Use React in Your Component: After loading React and ReactDOM, you can use them within the renderedCallback lifecycle method to render React components inside your LWC.
Update Your HTML Template: Add a container in your myReactComponent.html where the React component will be mounted.
There is React Library published by Salesforce which can be used seamlessly within LWC
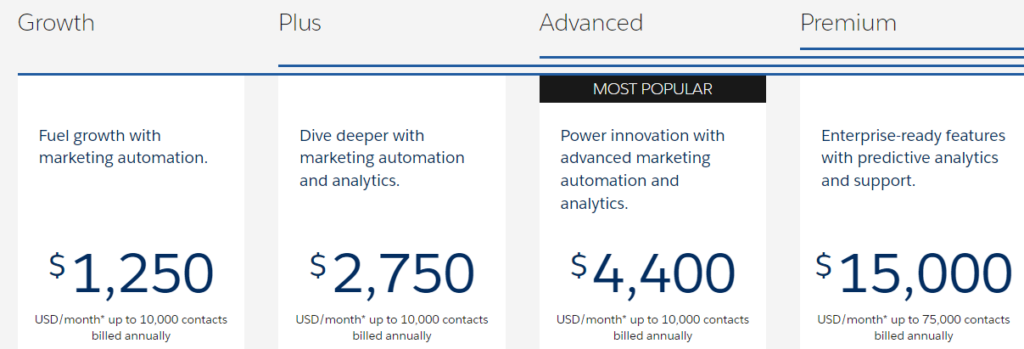
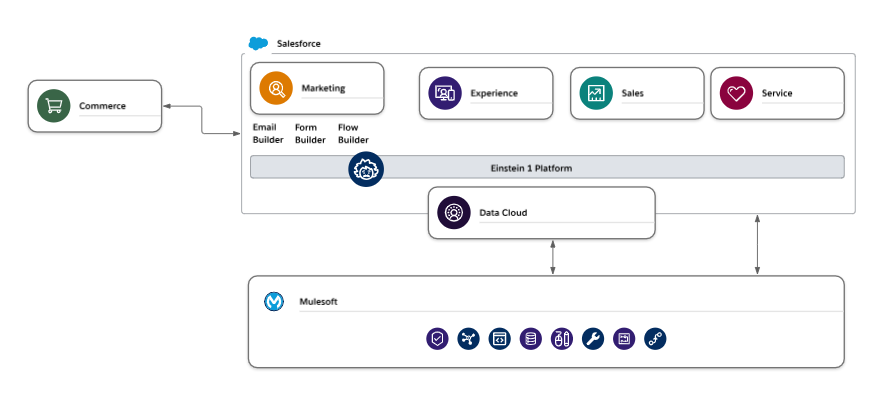
The Salesforce Marketing Cloud Growth Edition is a newly announced product designed specifically to cater to the needs of small to medium-sized businesses, facilitating their growth by leveraging data and AI technologies. This edition is part of Salesforce’s broader strategy to make advanced marketing automation tools more accessible to smaller companies, helping them to grow their businesses efficiently.
Integration with Data Cloud: Salesforce is offering no-cost access to Data Cloud for Marketing Cloud Engagement and Marketing Cloud Account Engagement customers who have Sales or Service Enterprise Edition licenses or above. This move is aimed at providing these customers with tools to achieve better business outcomes through faster market speed, more relevant content generation, increased conversions, and the ability to connect conversations across the entire customer relationship lifecycle.
Focus on AI and Efficiency: The Growth Edition aims to help brands grow by delivering campaigns and content more quickly with trusted AI and better personalizing customer relationships with data. It is designed to allow small teams to do more with fewer resources, laying a strong data foundation essential for successful generative AI, and leveraging enterprise AI capabilities for the first time.
Accessibility and Innovation: Although the Marketing Cloud Growth Edition brings new functionality, existing Marketing Cloud users do not need to switch to this new edition. Salesforce is committed to bringing further innovations to all its Marketing Cloud products, ensuring that all customers, regardless of the edition they use, can benefit from the platform’s capabilities.
The Salesforce Marketing Cloud Growth Edition introduces a suite of features and capabilities aimed at addressing and overcoming common marketing challenges faced by businesses, particularly small to medium-sized enterprises (SMEs)
1. Accessibility and Usability
Challenge Addressed: Complexity of marketing automation tools.
How Growth Edition Changes This: The Growth Edition simplifies the user experience, making it more accessible for businesses with limited technical expertise. By offering an intuitive interface and streamlined processes, it lowers the entry barrier for SMEs to adopt and effectively utilize marketing automation.
2. Data Integration and Management
Challenge Addressed: Fragmented customer data across platforms.
How Growth Edition Changes This: With the integration of Data Cloud, the Growth Edition allows for better data management and analytics capabilities. It enables businesses to consolidate their customer data across various touchpoints into a single, cohesive view, enhancing personalized marketing efforts and customer understanding.
3. AI and Personalization
Challenge Addressed: Delivering personalized customer experiences at scale.
How Growth Edition Changes This: Leveraging Einstein AI, the Growth Edition provides AI-driven insights and recommendations. This allows for more targeted and personalized marketing campaigns, improving engagement and conversion rates without requiring extensive manual analysis.
Challenge Addressed: Need for a solution that grows with the business.
How Growth Edition Changes This: Designed for scalability, the Growth Edition meets the needs of growing businesses by offering flexible features that adapt to increasing complexity in marketing strategies and customer base expansion.
5. Cost-Effectiveness
Challenge Addressed: High costs associated with marketing technology.
How Growth Edition Changes This: By tailoring its offering to the needs and budgets of smaller businesses, the Growth Edition provides a cost-effective entry point into advanced marketing automation, making it financially accessible for SMEs.
6. Streamlined Marketing Operations
Challenge Addressed: Operational inefficiencies in executing marketing campaigns.
How Growth Edition Changes This: The Growth Edition automates repetitive tasks and streamlines campaign management, freeing up time for strategic thinking and creativity. This efficiency gain translates into faster time-to-market and more effective use of resources.
7. Enhanced Customer Journeys
Challenge Addressed: Creating cohesive customer journeys across channels.
How Growth Edition Changes This: It offers tools to design and manage customer journeys seamlessly across multiple channels, ensuring a consistent and engaging customer experience. This holistic view of the customer journey helps in optimizing touchpoints and improving overall satisfaction.
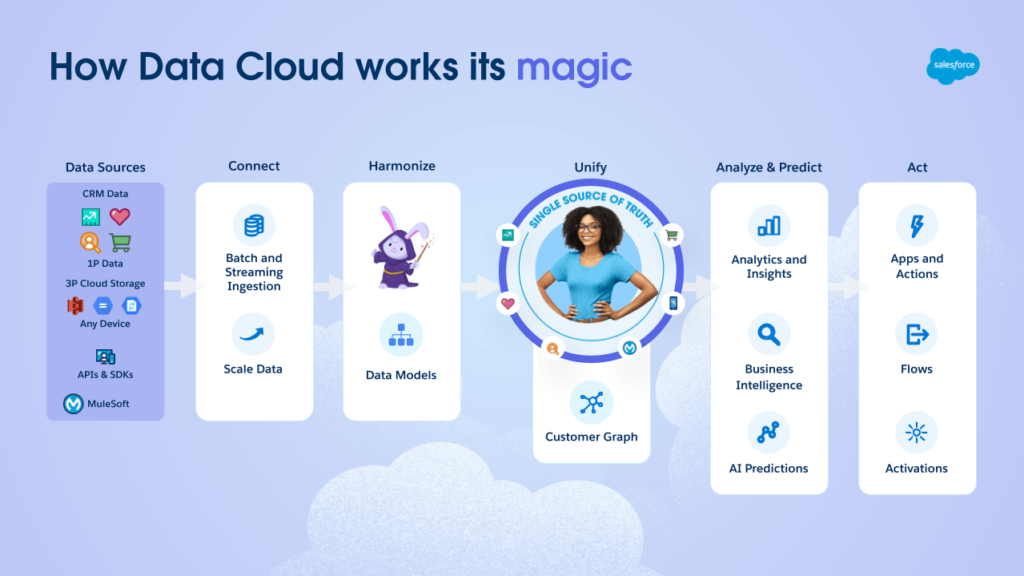
Are you ready to unleash the full potential of your business by harnessing the power of data? Look no further than Salesforce Data Cloud – a game-changing tool that empowers businesses with invaluable insights and strategic advantages. This comprehensive guide will delve into the depths of Salesforce Data Cloud, exploring its myriad benefits and unlocking its true power for your organization. Get ready to supercharge your decision-making processes, unlock hidden opportunities, and take your business to new heights with this ultimate resource!
Introduction to Salesforce Data Cloud
Salesforce Data Cloud is a powerful platform that enables businesses to unlock their customer data’s full potential. It is an integrated solution that combines data management, analytics, and AI capabilities to provide a holistic view of customer information. With its vast consumer and business data collection, Salesforce Data Cloud helps businesses gain valuable insights into their target audience, enhance their marketing strategies, and drive growth.
Salesforce Data Cloud is a cloud-based platform that offers access to one of the world’s largest collections of third-party consumer and business data. This includes over 30 billion records from over 300 million active users globally. The platform also provides real-time updates on demographic, firmographic, behavioral, and purchase intent data from various sources, such as social media platforms, government agencies, credit agencies, and more.
The primary goal of Salesforce Data Cloud is to help companies leverage this vast amount of data to understand their customers and create personalized experiences for them at every touchpoint. By integrating with the Salesforce Customer 360 platform, businesses can seamlessly connect customer data across multiple channels and devices.
Benefits of Using Salesforce Data Cloud
Salesforce Data Cloud is a powerful tool that has revolutionized how businesses handle and analyze customer data. With its advanced features and capabilities, Salesforce Data Cloud offers a wide range of benefits to businesses looking to maximize the potential of their data. This section will explore some of the key benefits of utilizing Salesforce Data Cloud for your business.
There are numerous benefits that businesses can reap by utilizing Salesforce Data Cloud:
1) Improved Customer Insights: With access to a diverse range of high-quality data points on consumers and businesses worldwide, companies can gain deeper insights into their target audience’s preferences, behavior patterns, buying habits, etc. This information allows them to personalize
2) Centralized Data Management:
One of the biggest advantages of using Salesforce Data Cloud is its ability to centralize customer data in one place. You no longer have to deal with fragmented data across different systems and platforms. With Salesforce Data Cloud, you can easily access and manage customer data from a single interface, allowing for better organization, collaboration, and analysis.
3) Real-Time Access to Relevant Customer Information:
Salesforce Data Cloud provides real-time access to relevant customer information, enabling businesses to make informed decisions based on accurate and up-to-date data. This is especially useful for sales teams who need quick insights into customers’ preferences, purchase history, and behavior patterns.
4) Enhanced Personalization:
With Salesforce Data Cloud’s advanced analytics capabilities, businesses can gain valuable insights into their customers’ behaviors and preferences. This allows them to personalize their marketing efforts and tailor their products or services according to individual needs, improving customer satisfaction and loyalty.
In this section, we will go over the various options of chat gpt and salesforce integration. There are three ways to achieve Chat GPT with Salesforce:
Build a custom integration using the Salesforce APEX to call GPT Model API
Pre-built integration packages or solutions are available on the Salesforce AppExchange
Create and Host a GPT model on any public cloud or local machine.
I don’t believe any ISV partner (https://appexchange.salesforce.com/) has already developed a package to integrate with the GPT Model. Also, creating and hosting a GPT model can be a complex task that requires a good understanding of machine learning and artificial intelligence.
GPT-3 is a pre-trained model that OpenAI provides; it is not publicly available to download and host on one’s local server or in the public cloud. So, options #2 and #3 are invalid at this moment.
Integrate GPT-3 Model API with Salesforce
We must use the API made available by the service that hosts the GPT model in order to call the predicted text from a Chat GPT model. Send an HTTP request from APEX to a specific endpoint. The body of the request is where you put any needed authentication information or parameters. High-level steps to Integrate Chat GPT with Salesforce
Sign up for an API key from OpenAI
Go to the OpenAI website (https://openai.com/) and click on the “Sign In” button in the top right corner of the page.
After signing in, click on the “API” button at the top of the page.
Click on the “Create an API Key” button on the API page.
Provide a name for your API Key and select the permissions you want to grant to the key.
Click on the “Create” button to create the key.
Once you have an API key, you can use it to request the GPT-3 API.
You can make a POST request to this endpoint with a JSON payload that includes your API key, the text you want to generate completions for, and any other parameters you want to customize the generated text.
Http http = new Http();
HttpRequest request = new HttpRequest();
request.setEndpoint('https://api.openai.com/v1/engines/davinci-codex/completions');
request.setMethod('POST');
request.setHeader('Content-Type', 'application/json');
request.setHeader('Authorization', 'Bearer ' + apiKey);
request.setBody(jsonPayload);
HttpResponse response = http.send(request);

if (response.getStatusCode() == 200) {
    // Success, parse the JSON response
    Map<String, Object> jsonResponse = (Map<String, Object>) JSON.deserializeUntyped(response.getBody());
    // process the jsonResponse
}
else {
    // Handle the error
}
This merely illustrates how to use the GPT-3 API that OpenAI provides; other providers might require various endpoints, authentication methods, and parameters.
It’s worth noting that OpenAI only provides the GPT models and not a chatbot service; however, the GPT models can be used as the core of a chatbot. But you must build the chatbot architecture, prompt and context management yourself.
Salesforce OmniStudio is a tool to build digital customer experiences tailored to any industry and can deliver automation for any business use case with its No-Code and Low-Code features. It provides automation with No-Code Low-Code feature only with configuration.
Salesforce OmniStudio is a great tool to create guided interactions that integrate into any industry-specific process. Admins can easily develop guided user experiences without code.
In that process, by only dragging components, the admin can integrate a component with external data. Imagine a developer or administrator consuming external system data in no time and a scalable manner without writing any code.
Show that data from Salesforce or external sources in a contextual screen for a full view of relevant data in a single place.
Why use OmniStudio
A Low Code No Code Platform enables customers to create guided brand experiences specific to their industry with clicks.
Drag-and-drop configuration capabilities
Effortlessly meet the demands of omnichannel service by deploying and updating these interactions across multiple devices and channels.
OmniStudio is part of Einstein Automate, which integrates Salesforce automation capabilities across Platform, Einstein, MuleSoft, Industries, and AppExchange to deliver an efficient end-to-end workflow platform.
Advantages of Omni Studio
Build a guided user flow that is highly customizable by configuration – The power of OmniScripts
Build customizable UI to show relevant data in a single screen from multiple data sources just by using clicked-based elements – Flexcards
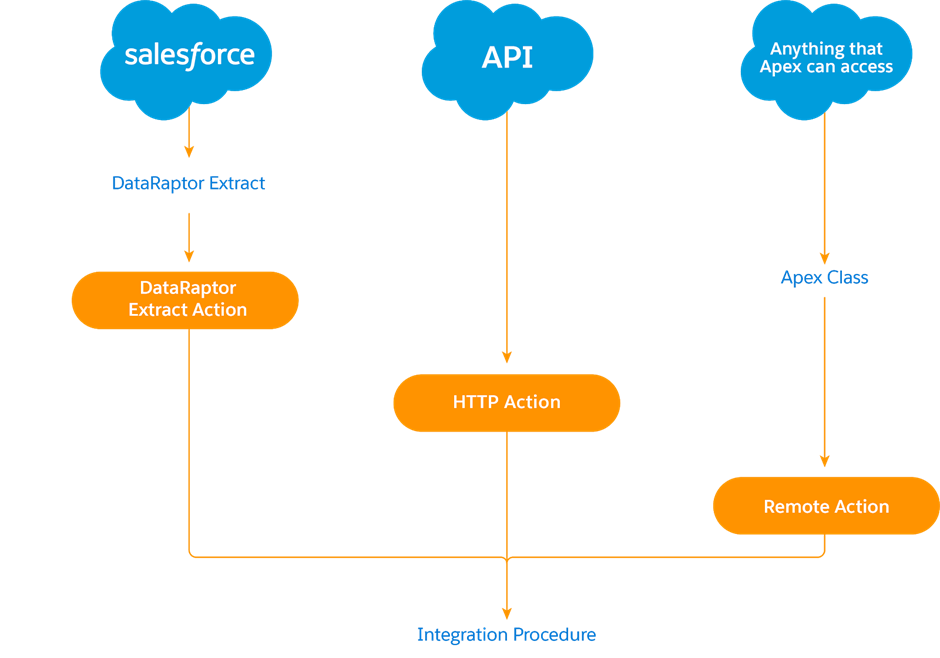
Declarative ETL tool that extracts, transforms and loads data in Salesforce without writing code; operates behind the OmniScripts and Flexcards – DataRaptors
Declarative way to retrieve data from Salesforce/third-party services without any additional user interaction; run server-side for greater performance – Integration Procedures
Components of OmniStudio
FlexCards: Cards that display contextual information and actions in an at-a-glance format for a customer. A Datasource Wizard populates a FlexCard with data from one or more sources via point-click integration.
OmniScripts: A guided path to complete a business process. It’s a Modular Architecture in nature. A developer can integrate data from multiple sources (Salesforce or third-party), manipulate it, and send it back to its source, all from within the OmniScript. The data is captured in the standard JSON format.
OmniScripts has a great feature to dynamically generate documents from templates (MS Word, PDF, and HTML outputs), merge data from any data source, and then create and operate on these documents, like attaching them to Salesforce records and emailing them to recipients, plus delegate to DocuSign for eSignatures.
DataRaptors: Configurable services for retrieving, transforming, and updating data. A DataRaptor mapping tool enables you to read, transform, and write Salesforce data. There are four types of DataRaptor: Turbo Extract, Extract, Load, and Transform.
Integration Procedures: Declarative features and server-side processes that execute multiple actions in a single service call. An Integration Procedure is also recommended when you need fast processing of complex data from multiple sources. Server-side processing enables faster performance since, in most cases, the server is faster than the client at processing data. Combining multiple actions in a single server call prevents round trips to the server. Minimizing client/server calls is beneficial, as more round trips mean slower performance.
DataRaptors and Integration Procedures deliver data to and from UI components. They orchestrate calls to Apex classes, calculation engines, and external application programming interfaces (APIs) to execute whatever business logic is required.
Salesforce Omni Studio
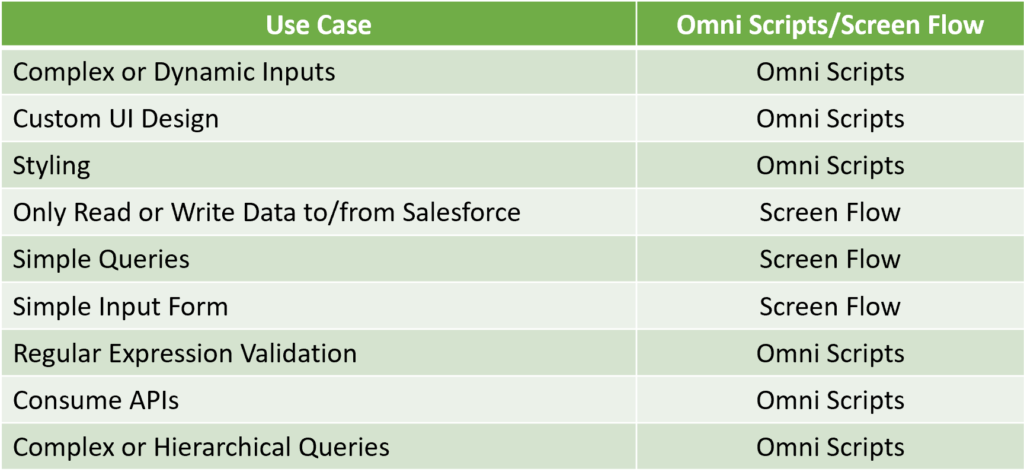
Omni Scripts Vs Screen Flow: When to Use What
How to get an Omni Studio Developer Org
Signup for a Developer Edition org that has OmniStudio pre-installed. The org has all the data you need for hands-on practice in the OmniStudio Trailhead modules. This special org has a 180-day license
OmniStudio is included with specific Industries subscriptions: Financial Service, Health Cloud, Manufacturing, and Vlocity Clouds(Communications, Media, Energy and utilities, Public Sector, and Insurance)
Salesforce has recently released Hyperforce to host the Salesforce App in a public server of your choice. Hyperforce is an entirely new infrastructure architecture that unifies the foundations of the various clouds and allows Salesforce to scale rapidly and securely using Public Cloud Partners, including Microsoft Azure, Amazon Web Services, and Google Cloud Platform.
Hyperforce is currently available in India, Australia, Canada, Japan, Singapore, Germany, France, and Brazil for Salesforce Core Services (“Core”). Customer 360 Audiences (CDP) is live on Hyperforce in the US and Germany
Countries like China, Russia, and others have strict data policies. Many Countries impose laws on what data can be hosted outside their borders and what data can’t go outside the country. In those customer requirements, Hyperforce comes to the rescue and supports local data storage, meaning customer data will not be transferred outside that country. Hyperforce means that data is stored at rest in the country. Data can be transmitted out of the country through standard interfaces.
Hyper-scalable: Implement faster with a super flexible infrastructure, Protect sensitive data with the built-in trust of Salesforce.
Run your business from anywhere with the world’s most trusted public cloud
Hyperforce uses modern, cloud-based technologies that require you to adopt technical best practices in order to maintain connectivity with Salesforce. On Hyperforce, there are mandatory best practices:
Don’t use hard-coded instance references
Don’t use hard-coded IP allowlists.
Use HTTP1.1 or higher to call Salesforce API endpoints
Include a Service Name Indicator (SNI) in your TLS ClientHello message when connecting to a Salesforce service
What products are currently available on Hyperforce?
Core Salesforce Services (the services branded as Sales Cloud, Service Cloud, Experience Cloud, Chatter, and Lightning Platform)
Tableau CRM (including Einstein Discovery), Consumer Goods Cloud, Manufacturing Cloud, Service Cloud Voice
Customer 360 Audiences (CDP)
Managed packages branded as Salesforce CPQ and Salesforce Billing (together formerly branded as Salesforce Quote-to-Cash), Health Cloud, Financial Services Cloud, Sustainability Cloud, Salesforce Maps, and the Field Service managed package (“FSMP”), which is a feature of Service Cloud
Licensing Currently, there is no cost for applications to run on Hyperforce.
Hyperforce Assistant: Salesforce provides tools and assistance to migrate the current Salesforce Org to Hyperforce. Salesforce provides Org Readiness Check; very similar to Lightning Migration Readiness Check to perform Hyperforce Specific Checks like
Hard coded URLs
IP Allowlist
HTTP 1.0
During the plan migration, the existing Salesforce Org will be made read-only.
Salesforce Health Cloud Solution is a Customer Relation Management system that allows users and healthcare staff to access all patient information including medical history and upcoming health check-up appointments in real-time to Deliver Great Patient Care with Salesforce Health Cloud.
Four Major wings connect the healthcare system of an organization
PROVIDERS
•360-degree view of patient data
•Complete patient experience & Real-time patient coordination and engagement
PAYERS
•Member care management & member journey
•Personalized member services
MEDTECH
•Manage commercial processes, build provider relationships, and engage with patients in a more efficient, compliant, and personal way.
PHARMA
•Deliver personalized patient and provider engagement and support programs while accelerating R&D innovation on a connected platform.
Salesforce Health Cloud
There are two Salesforce Health Cloud Licenses
Health Cloud Enterprise – Out-of-the-box CRM for healthcare and life sciences
Health Cloud Unlimited – Unlimited CRM power and support for healthcare and life sciences.
Use the below document to select right Health Cloud Edition for your business
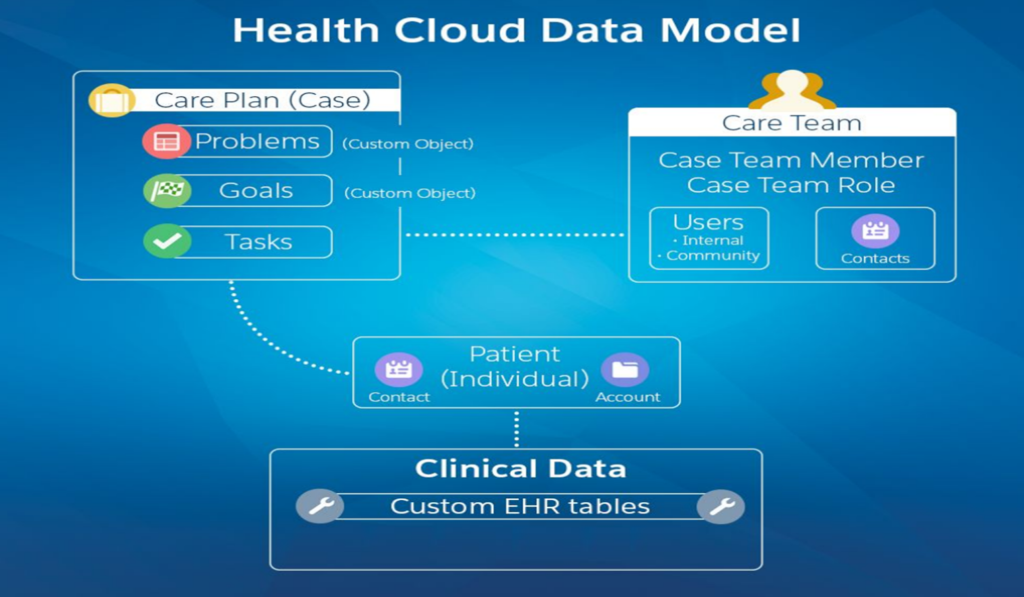
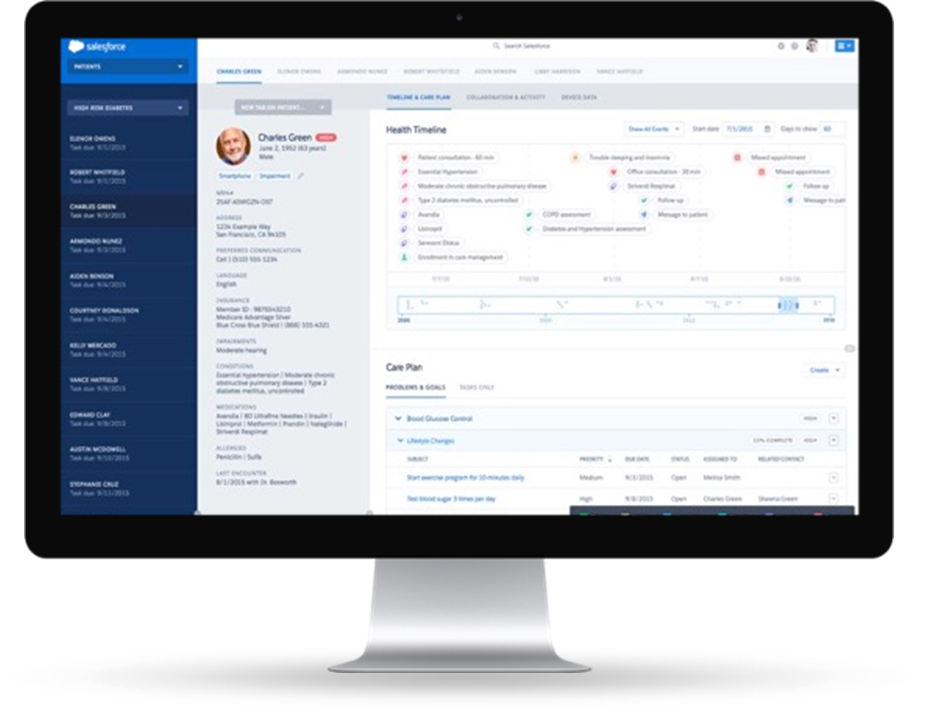
A Complete View of the Patient: Comprehensive patient care timeline with integrated EMR and device data
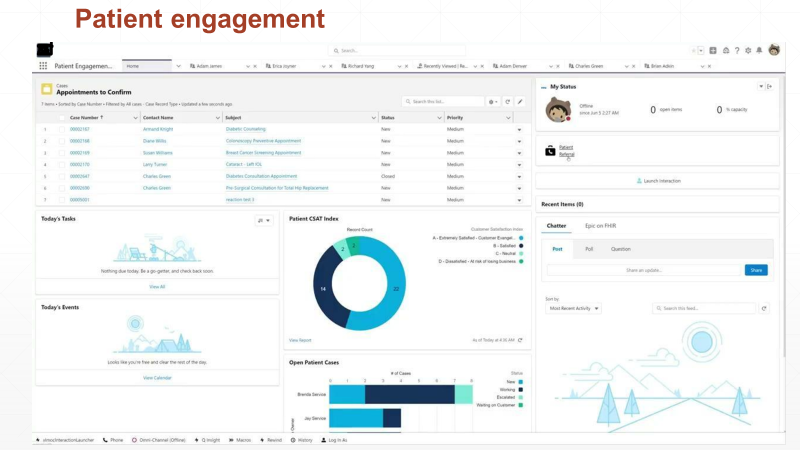
Smarter Patient Management: Engage with patients and the entire care team in real-time
Proactive Patient Engagement: Allow patients to manage personal healthcare goals and access complete care team
Salesforce Console – Allows healthcare professionals to Manage patients with ease • Segment patients into useful lists based on various criteria in the population • Track tasks and issues • Create and execute care plans in the context of the patient’s full picture o View more than just the patient – Complete care timeline and patient card view o Facilitate collaboration • Collaborate with patient teams within the organization • Coordinate with family caregivers and unaffiliated health professionals through communities
Health Cloud Console
Salesforce Patient Communities- Allows patients to:
Stay on top of health care goals
Access to the care plan
Reminders and tasks
Completion of surveys and forms
Easy collaboration with the entire care network
Find answers to questions quickly with Knowledge & search
Mobile access anytime, anywhere
Salesforce Health Cloud will also bundle Salesforce Shield to achieve HIPAA-compliant use of the product.
Salesforce complies with HIPAA in its capacity as a business associate. Salesforce Health Cloud also includes specific functionality to help customers achieve HIPAA-compliant use of the platform in their role as a covered entity. This includes a robust set of security, privacy, monitoring, logging, and encryption tools through Salesforce Shield to make it safe to store and operate on PHI in Salesforce Health Cloud.